Installation
The officially supported installation process is to use the docker-compose that is shipped with the repo. Installing in a method other than docker-compose is left as an exercise to the user. Read the compose and the docker files for each container should give you a headstart.
Docker and Compose
Install Docker and docker-compose using the offical guides at https://docs.docker.com/get-docker/
HoneySwarm
If you want to run the latest stable release use the following docker-compose file and pin a release tag
version: '3.7'
services:
honeyswarm:
   image: honeyswarm/honeyswarm
   container_name: honeyswarm
   env_file:
      - honeyswarm.env
   ports:
      - "8080:8080"
   networks:
      honeynet:
      ipv4_address: 10.1.0.101
   volumes:
      - "honeyswarmStates:/opt/honeystates/salt:rw"
   depends_on:
      - mongoserver
      - saltmaster
mongoserver:
   image: mongo:latest
   container_name: honeyswarm_db
   env_file:
      - honeyswarm.env
   ports:
      - '27017:27017'
   networks:
      honeynet:
      ipv4_address: 10.1.0.102
   volumes:
      - "honeyswarmDB:/data/db"
saltmaster:
   image: "saltstack/salt:latest"
   container_name: honeyswarm_saltstack
   env_file:
      - honeyswarm.env
   ports:
      - "8000:8000"
      - "4505:4505"
      - "4506:4506"
   networks:
      honeynet:
      ipv4_address: 10.1.0.103
   volumes:
      - "honeyswarmPKI:/etc/salt/pki:rw"
      - "honeyswarmStates:/srv/salt:rw"
hpfeeds-broker:
   image: honeyswarm/honeyswarm_broker
   container_name: honeyswarm_broker
   ports:
   - "0.0.0.0:10000:10000"
   networks:
      honeynet:
      ipv4_address: 10.1.0.104
   env_file:
      - honeyswarm.env
   depends_on:
      - mongoserver

networks:
honeynet:
   driver: bridge
   ipam:
      driver: default
      config:
      - subnet: 10.1.0.0/24

volumes:
honeyswarmDB:
honeyswarmPKI:
honeyswarmStates:
If you prefer a development version then git clone git@github.com:honeyswarm/honeyswarm.git
Create a docker-compose.yml file on the host you want to operate as the HoneySwarm Controller. Add the contents of the compose file from above.
Create a honeyswarm.env file in the same directory as the docker-compose and add the following content. The latest version can be found in the git repo.
# Salt Master details
SALT_USERNAME=salt
SALT_SHARED_SECRET=supersecretsaltstackmasterstring
SALT_HOST=https://127.0.0.1:8000

# Flask Shell
FLASK_APP=honeyswarm.py
PYTHONPATH=/opt/
SESSION_SECRET=MuhktUNBDthagZkY477ZWcXfM41x5dRuao8eEXZK

# Mongo Details
MONGODB_HOST=127.0.0.1
MONGODB_PORT=27017
MONGODB_USERNAME=admin
MONGODB_PASSWORD=admin
MONGODB_AUTH_SOURCE=admin
MONGODB_DATABASE=honeyswarm
MONGO_INITDB_ROOT_USERNAME=admin
MONGO_INITDB_ROOT_PASSWORD=admin

# HPFeeds
WAIT_HOSTS=127.0.0.1:27017
Configuration
Copy honeyswarm_template.env to honeyswarm.env and change the default passwords and tokens as per the list below.
- SALT_SHARED_SECRET
- MONGODB_USERNAME and MONGO_INITDB_ROOT_USERNAME
- MONGODB_PASSWORD and MONGO_INITDB_ROOT_PASSWORD
Please leave all the HOST names and ports as they are pre configured.
If you wish to change the external HTTP port from 8080 to something of your choice edit the docker-compose.yml file.
Once you have made your changes you will need to start the application and complete the first time setup.
First Time Setup
Start Honeyswarm using the command docker-compose up. Refer to the Starting section for more details.
The first start will download all the required docker images and configure them as per the .env file.
Once you start your HoneySwarm instance for the first time you will need to run the initial installation. To start the install visit http://HONEYSWARMIP:8080/install
You should be presented with an installation form.
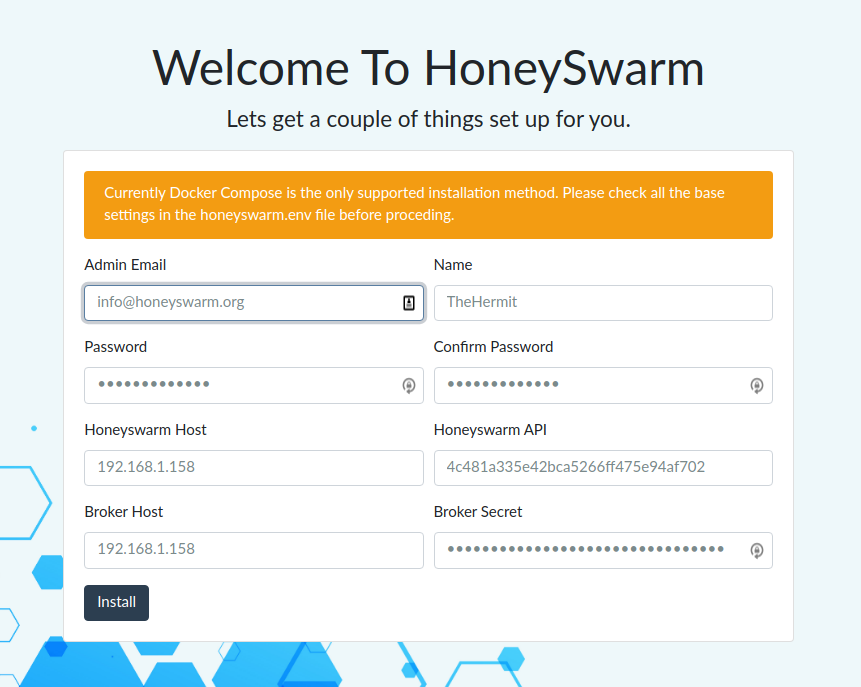
Fill all the required fields.
- Honeyswarm Host: This should be set to an IP address that your honeypot hosts (Hives) can access.
- Honeyswarm API: This will autofil with a randomly generated API Key, but you can change it. This is the key that will be used to run the initial Hive setup
- BrokerHost: This is the HPFeeds Broker IP, if your using the default installation this should be set to match the HoneySwarm Host fields
- Broker Secret: This is the main auth key that will be used to Subscribe to ALL incoming honeypot Events.
As part of the installation HoneySwarm will download and install all the available frames and honeypots.
Once the installation has completed you will need to stop and restart the docker-compose to restart all the services with the new configuration.
Starting
All commands must be executed from the honeyswarm directory.
To start the application in the background enter docker-compose up -d in a terminal.
To start the application in the forground with visible logging enter docker-compose up in a terminal.
Backup / Restore
Volumes
To maintain persistance of data HoneySwarm uses docker volumes. As long as you do not prune or destory these volumes you can start, stop and upgrade your HoneySwarm containers without losing data.
Backup
For details on backing up or restoring docker volumes please refer to the docker documentation.
Update
If your using docker-compose you can update your installation by following these steps.
Note This will take your hpfeeds broker offline for a few minutes and you will not store any incoming events.
cdto the honeyswarm directorydocker-compose pulldocker-compose up --force-recreate --build -d